
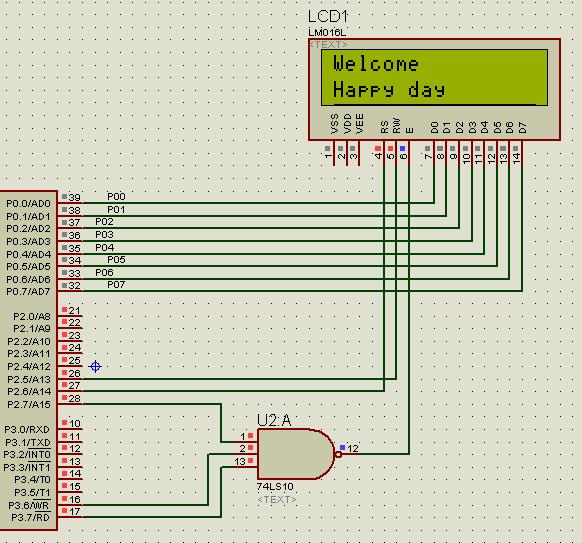
第一行顯示"Welcome";第二行顯示="Happy day";若要顯示其他字符,請直接往數組 LCMLineOne[16]和LCMLineTwo[16]填充相應的代碼。直接上圖,仿真圖如下:
源程序如下,可以對比時序方式,理解總線的操作方法。

#include<reg51.h>
//#include<absacc.h>
#define uchar  unsigned char
#define uint   unsigned int
#define busy  0x80
uchar  xdata  LCMWriteCOM   _at_ 0x80ff;  //寫指令寄存器
uchar  xdata  LCMReadCOM    _at_ 0xa0ff ;  //讀指令寄存器
uchar  xdata  LCMWriteData  _at_ 0xc0ff ; //寫數據寄存器
uchar  xdata  LCMReadData   _at_ 0xe0ff ;  //讀數據寄存器
uchar  data   LCMLineOne[16]="Welcome";  //第一行顯示的數據
uchar  data   LCMLineTwo[16]="Happy day";  //第二行顯示的數據

void Delayms(uchar  ms)
{
 uchar  i,j;
 for(i=0;i<ms;i++)
 for(j=0;j<57;j++)
 ;
}
//寫指令寄存器
void LCMWriteC(uchar  COMData)
{ uchar LCMStatus;
  do
  {
  LCMStatus=(LCMReadCOM&busy);
  }
 while(LCMStatus!=0);
  LCMWriteCOM=COMData;
}
//讀指令寄存器
uchar LCMReadC()
{uchar LCMStatus;
  do
  {
  LCMStatus=(LCMReadCOM&busy);
  }
 while(LCMStatus!=0);
  LCMStatus=LCMReadCOM;
  return(LCMStatus);
}
//讀數據寄存器
uchar LCMReadD(uchar addr)
{uchar LCMStatus;
  do
  {
  LCMStatus=(LCMReadCOM&busy);
  }
 while(LCMStatus!=0);
  LCMWriteC(0x80+addr);
  LCMStatus=LCMReadData;
  return(LCMStatus);
}
//寫數據寄存器帶地址
void LCMWriteDAdd(uchar addr,uchar LCMData)
{uchar LCMStatus;
  do
  {
  LCMStatus=(LCMReadCOM&busy);
  }
 while(LCMStatus!=0);
  LCMWriteC(0x80+addr);
  LCMWriteData=LCMData;
}

//寫數據寄存器無地址
void LCMWriteD(uchar LCMData)
{uchar LCMStatus;
  do
  {
  LCMStatus=(LCMReadCOM&busy);
  }
 while(LCMStatus!=0);
  LCMWriteData=LCMData;
}
//初始化
void LCMInit(void)
{ Delayms(15);
 LCMWriteCOM=0x38;
 Delayms(5);
 LCMWriteCOM=0x38;
 Delayms(5);
 LCMWriteCOM=0x38;
 Delayms(5);

 LCMWriteC(0x38);
 LCMWriteC(0x08);
 LCMWriteC(0x01);
 LCMWriteC(0x06);
 LCMWriteC(0x0c);
}

main()
{ uchar i;
  LCMInit();
 while(1)
  { LCMWriteC(0x80);      //第一行開始地址
  for(i=0;i<16;i++)
    LCMWriteD(LCMLineOne[i]);
  LCMWriteC(0x80+0x40);   //第二行開始地址
  for(i=0;i<16;i++)
    LCMWriteD(LCMLineTwo[i]);
  }
}