���ˌ�(du��)osal̎����Ϣ�ęC(j��)�Ƽ�����Д�(sh��)��(j��)�����գ��f(xi��)�h����������ô��̎���õ�����Ҫ�Ĕ�(sh��)��(j��)�����c(di��n)������������Һ�(ji��n)�εİ����ҵ����⌑һ�¡�
�䌍(sh��)ֻҪ�|�l(f��)SYS_EVENT_MSG�¼������ȶ���(hu��)���@��һ��(g��)�Z(y��)�䣺 MSGpkt = (afIncomingMSGPacket_t *)osal_msg_receive( SampleApp_TaskID ); �҂�һ��һ�����º���(sh��)����˼��������osal_msg_receive�����@��(g��)����(sh��)������һ��ԭ�ͣ� @fn osal_msg_receive
*
* @brief
*
* This function is called by a task to retrieve a received command
* message. The calling task must deallocate the message buffer after
* processing the message using the osal_msg_deallocate() call.
*����(sh��)������ ԓ����(sh��)ͨ�^һ��(g��)�΄�(w��)�{(di��o)�Á�z���յ���������Ϣ���{(di��o)�õ��΄�(w��)���������osal_msg_deallocate()����(sh��)̎����Ϣ֮����ጷ���Ϣռ�õă�(n��i)�档
* @param byte task_id - receiving tasks ID
*�յ����΄�(w��)ID
* @return *byte - message information or NULL if no message
*��Ϣ��Ϣ���߿�ָ�
byte *osal_msg_receive( byte task_id )
{
osal_msg_hdr_t *listHdr;
osal_msg_hdr_t *prevHdr=0;
halIntState_t intState; // Hold off interrupts
HAL_ENTER_CRITICAL_SECTION(intState); �@��(g��)��Ҫ���ڕ����Д� // Point to the top of the queue
listHdr = osal_qHead; ָ����Ϣ�(du��)�е��^�� // Look through the queue for a message that belongs to the asking task ���(du��)���в��Ҍ���ԓ�΄�(w��)����Ϣ��
while ( listHdr != NULL )
{
if ( (listHdr - 1)->dest_id == task_id )
{
break;
}
prevHdr = listHdr;
listHdr = OSAL_MSG_NEXT( listHdr );
} // Did we find a message? �Ƿ��ҵ���Ϣ��
if ( listHdr == NULL )
{
// Release interrupts ጷ��Д�
HAL_EXIT_CRITICAL_SECTION(intState);
return NULL;
} // Take out of the link list ��朽�朱����ó���
osal_msg_extract( &osal_qHead, listHdr, prevHdr ); // Release interrupts
HAL_EXIT_CRITICAL_SECTION(intState); return ( (byte*) listHdr );
} �@��(g��)����(sh��)������Ҫ����ȡ����ԓ�΄�(w��)����Ϣ��osal�ں��_(t��i)�S�o(h��)һ��(g��)��Ϣ�(du��)�У���(du��)��(y��ng)���΄�(w��)������ԓ��Ϣ�(du��)������ȡ�������Լ�����Ϣ���Ķ��Д����Ă�(g��)�r(sh��)�g��Ҫ̎�������@����һ��(g��)���}������o(h��)sal��ô����Ϣ�͵�osal����Ϣ�(du��)����ȥ�أ�����߀��һЩ���}�]��������]�£������^�m(x��)�о����҂�?c��)ڳ����кú����ң��@���漰��osal�\(y��n)�з�ʽ�ˣ��҂��úÿ�����һ��ҪŪ���ף� �҂���֪�����_�l(f��)�Լ��đ�(y��ng)�ó���r(sh��)����(du��)���҂��_�l(f��)�߁��f��һ��(g��)�΄�(w��)��������Ҫ�ăɂ�(g��)���֣�����Ҫ�����������nj��΄�(w��)��ʼ������(sh��)��Ȼ��������(y��ng)���¼�̎������(sh��)����(d��ng)Ȼ�����һ���nj��Լ��������΄�(w��)���ӵ�osal�΄�(w��)�(du��)����ȥ���@��(g��)��Ҫ��osalAddTasks()����(sh��)����ɡ� ����(du��)������(g��)osal�\(y��n)�Ё��f����Ҫ���^�����£� ������Ҫ���M(j��n)��һϵ�еij�ʼ����Ȼ������M(j��n)��һ��(g��)��ѭ�h(hu��n)����(sh��)osal_start_system() ZSEG int main( void )
{
// Turn off interrupts
osal_int_disable( INTS_ALL );
// Make sure supply voltage is high enough to run
zmain_vdd_check(); // Initialize stack memory
zmain_ram_init(); // Initialize board I/O
InitBoard( OB_COLD ); // Initialze HAL drivers
HalDriverInit(); // Initialize NV System
osal_nv_init( NULL ); // Determine the extended address
zmain_ext_addr(); // Initialize basic NV items
zgInit(); // Initialize the MAC
ZMacInit(); #ifndef NONWK
// Since the AF isn't a task, call it's initialization routine
afInit();
#endif // Initialize the operating system
osal_init_system(); // Allow interrupts
osal_int_enable( INTS_ALL ); // Final board initialization
InitBoard( OB_READY ); // Display information about this device
zmain_dev_info();
#ifdef LCD_SUPPORTED
zmain_lcd_init();
#endif osal_start_system(); // No Return from here
} // main() osal_start_system()�@��(g��)����(sh��)��ԭ�����£�����Ҫ�����Lj�(zh��)���΄�(w��)�(du��)���е��΄�(w��)����Ҫ��ͨ�^����ѭ�h(hu��n)�팍(sh��)�F(xi��n)�� void osal_start_system( void )
{
uint16 events;
uint16 retEvents;
byte activity;
halIntState_t intState; // Forever Loop
#if !defined ( ZBIT )
for(;;)
#endif
{
Hal_ProcessPoll();// activity = false; activeTask = osalNextActiveTask();
if ( activeTask )
{ ������΄�(w��)��Ԓ�͕����Дࡣ
HAL_ENTER_CRITICAL_SECTION(intState);
events = activeTask->events;//�M(j��n)���¼�
// Clear the Events for this task
activeTask->events = 0;//��(du��)��(y��ng)�¼���0
HAL_EXIT_CRITICAL_SECTION(intState); �_�ſ��ࡣ if ( events != 0 )
{
// Call the task to process the event(s)
if ( activeTask->pfnEventProcessor )// �{(di��o)������(y��ng)���΄�(w��)�¼�̎������(sh��)
{
retEvents = (activeTask->pfnEventProcessor)( activeTask->taskID, events ); // Add back unprocessed events to the current task
HAL_ENTER_CRITICAL_SECTION(intState);
activeTask->events |= retEvents;
HAL_EXIT_CRITICAL_SECTION(intState); activity = true;
}
}
} // Complete pass through all task events with no activity?
if ( activity == false )//�]������(y��ng)���΄�(w��)��Ҫ̎������M(j��n)������ģʽ��
{
#if defined( POWER_SAVING )
// Put the processor/system into sleep
osal_pwrmgr_powerconserve();//�M(j��n)������
#endif
}
} ����(g��)������������ܲ���֪���΄�(w��)����¼�����ô�|�l(f��)�ģ���Ϣ����ô�M(j��n)�Ђ��f�ģ����Ե��^�m(x��)���¿������c(di��n)�y�ǰɣ��]�k�����炃���]��(j��ng)�^�����Ė|���������@ô�o(w��)����O(��_��)O����~�������^�m(x��)�� �@��(g��)����(sh��)����һ��(g��)�P(gu��n)�I����(sh��)��Hal_ProcessPoll()����ҪС���@��(g��)����(sh��)���@��(g��)����(sh��)��ϵ�y(t��ng)�O(sh��)����һ��(g��)"����",�Q֮��������ԭ����Ҫ����?y��n)��@��(g��)�O(sh��)����һ��(g��)���r(sh��)������osal�\(y��n)�еĕr(sh��)犣��F(xi��n)�ڵ��P(gu��n)�I�Ǹ�����@��(g��)�r(sh��)������O(sh��)�ã���������(d��o)osal�����������h(yu��n)�ˣ��]�£����@Щ�������������Ȼ���֪����Ϣ�Ă����^�̣��@��(g��)����(sh��)�{(di��o)�õ����@��(g��)����(sh��) HalTimerTick�������@��(g��)����(sh��)ԭ�����£� void HalTimerTick (void)
{
if (!halTimerRecord[HW_TIMER_1].intEnable)
{
halProcessTimer1 ();
} if (!halTimerRecord[HW_TIMER_3].intEnable)
{
halProcessTimer3 ();
} if (!halTimerRecord[HW_TIMER_4].intEnable)
{
halProcessTimer4 ();
}
} ���ģ������c(di��n)���}���Ҳ�֪���@ЩӋ(j��)�r(sh��)�������ú���(sh��)���ģ��������Ă�(g��)���r(sh��)������osal�\(y��n)�еĕr(sh��)��أ�halTimerRecord[HW_TIMER_1].intEnable�������������õ��қ]�ҵ�����(y��ng)�ĺ���(sh��)���]�£��ȵȣ��^�m(x��)�ҡ������� �����ҵĸ��X�����osal�΄�(w��)��ʼ������(sh��)��(��ʼ���ҕ�(hu��)����һ��(ji��)���v���@��(ji��)��ֻ�v�v�@��(g��))�϶������ҵ�һЩ���ߣ����ǰ���˼·����ȥ������һ��(g��)���e(cu��)�İl(f��)�F(xi��n)���@��(g��)�ǰ弉(j��)��ʼ������(sh��)���҂����ң� void InitBoard( byte level )
{
if ( level == OB_COLD )
{
// Initialize HAL
HAL_BOARD_INIT();
// Interrupts off
osal_int_disable( INTS_ALL );
// Turn all LEDs off
HalLedSet( HAL_LED_ALL, HAL_LED_MODE_OFF );
// Check for Brown-Out reset
ChkReset();
OnboardTimerIntEnable = FALSE;
HalTimerConfig (OSAL_TIMER, // 8bit timer2
HAL_TIMER_MODE_CTC, // Clear Timer on Compare
HAL_TIMER_CHANNEL_SINGLE, // Channel 1 - default
HAL_TIMER_CH_MODE_OUTPUT_COMPARE, // Output Compare mode
OnboardTimerIntEnable, // Use interrupt
Onboard_TimerCallBack); // Channel Mode } ����Ҫ�����@��(g��)����(sh��) HalTimerConfig�����O(sh��)���˕r(sh��)犡�
else // !OB_COLD
{
#ifdef ZTOOL_PORT
MT_IndReset();
#endif
OnboardKeyIntEnable = HAL_KEY_INTERRUPT_DISABLE;
HalKeyConfig( OnboardKeyIntEnable, OnBoard_KeyCallback);
} ������HalTimerConfig������ԭ�ͣ� uint8 HalTimerConfig (uint8 timerId, uint8 opMode, uint8 channel, uint8 channelMode,
bool intEnable, halTimerCBack_t cBack)
{
uint8 hwtimerid; hwtimerid = halTimerRemap (timerId); if ((opMode & HAL_TIMER_MODE_MASK) && (timerId < HAL_TIMER_MAX) &&
(channelMode & HAL_TIMER_CHANNEL_MASK) && (channel & HAL_TIMER_CHANNEL_MASK))
{
halTimerRecord[hwtimerid].configured = TRUE;
halTimerRecord[hwtimerid].opMode = opMode;
halTimerRecord[hwtimerid].channel = channel;
halTimerRecord[hwtimerid].channelMode = channelMode;
halTimerRecord[hwtimerid].intEnable = intEnable;
halTimerRecord[hwtimerid].callBackFunc = cBack;//�O(sh��)�û��{(di��o)����(sh��)��ָᘡ�
}
else
{
return HAL_TIMER_PARAMS_ERROR;
}
return HAL_TIMER_OK;
} �ӌ��{(di��o)��������ҵ����@��(g��)����(sh��)���ӌ��{(di��o)�õ��ҾͲ��������ˣ�ֻ������Ҫ�ģ� void osal_update_timers( void )
{
osalTimerUpdate( tmr_decr_time );//tmr_decr_time��void osalTimerInit( void )�xֵ���飺 tmr_decr_time = TIMER_DECR_TIME;define TIMER_DECR_TIME 1 // 1ms - has to be matched with TC_OCC ����һ���뼴��ÿ��һ�������һ�ζ��r(sh��)����������һ��(g��)���}�����������п����@��(g��)���r(sh��)���]�б����_�� } osalTimerUpdate( tmr_decr_time )ԭ�ͣ�
*********************************************************************
* @fn osalTimerUpdate
*
* @brief Update the timer structures for a timer tick.
*���¶��r(sh��)���Ĕ�(sh��)��(j��)�Y(ji��)��(g��u) * @param none
*
* @return none
*********************************************************************/
static void osalTimerUpdate( uint16 updateTime )//�@��(g��)����(sh��)�����c(di��n)�����c(di��n)�������^�X����֪����ɶ�����һ��(g��)���r(sh��)��朱���
{
halIntState_t intState;
osalTimerRec_t *srchTimer;
osalTimerRec_t *prevTimer;
osalTimerRec_t *saveTimer; HAL_ENTER_CRITICAL_SECTION( intState ); // Hold off interrupts. // Update the system time
osal_systemClock += updateTime; // Look for open timer slot
if ( timerHead != NULL )
{
// Add it to the end of the timer list
srchTimer = timerHead;
prevTimer = (void *)NULL; // Look for open timer slot
while ( srchTimer )
{
// Decrease the correct amount of time
if (srchTimer->timeout <= updateTime)
srchTimer->timeout = 0;
else
srchTimer->timeout = srchTimer->timeout - updateTime; // When timeout, execute the task
if ( srchTimer->timeout == 0 )
{
osal_set_event( srchTimer->task_id, srchTimer->event_flag );//�@��(g��)����(sh��)�����P(gu��n)�I�� // Take out of list
if ( prevTimer == NULL )
timerHead = srchTimer->next;
else
prevTimer->next = srchTimer->next; // Next
saveTimer = srchTimer->next; // Free memory
osal_mem_free( srchTimer ); srchTimer = saveTimer;
}
else
{
// Get next
prevTimer = srchTimer;
srchTimer = srchTimer->next;
}
} #ifdef POWER_SAVING
osal_retune_timers();�@��(g��)����(sh��)�Ժ����f��
#endif
} HAL_EXIT_CRITICAL_SECTION( intState ); // Re-enable interrupts.
} ߀������һ��(g��)�D�f�����r(sh��)����(sh��)��(j��)朱��ɣ�ԓ�D����?sh��)W�����ĹPӛ�� �䌍(sh��)����һ��(g��)��(sh��)��(j��)�Y(ji��)��(g��u)���]ɶ��(f��)�s�ģ���Ҫ���(f��)�s�ˣ� typedef struct
{
void *next;
UINT16 timeout;
UINT16 event_flag;
byte task_id;
} osalTimerRec_t;��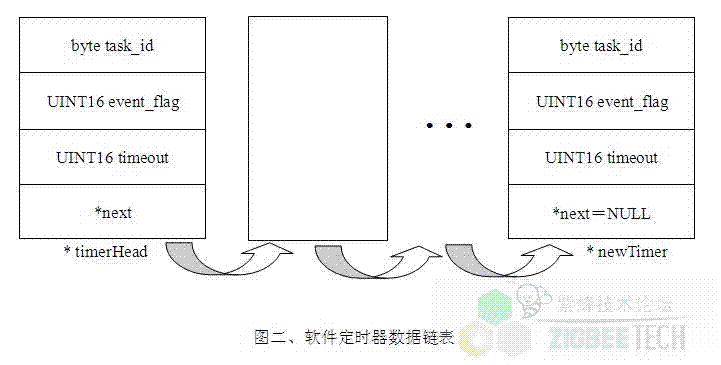
���c(di��n)�����Ȳ���������ˣ��Ҳ�֪�������@��(g��)朱�����ô���µģ�����������朱���ֵ����ô�xֵ�ģ���ʲôҪ�む(g��)�@�ӵı������������ģ����˸�����_�^���������ܵ��F(xi��n)���@ô�h(yu��n)�ĵط��ˣ�Խ�fԽ�h(yu��n)���]�k���ˣ�����ɰ偆����װɣ��Ȱ��@��(g��)�����֮���ځ������溯��(sh��)�ľ��w���ã��ҿ��ˊW��������һЩ�|�������X��Щ���Ǻ܌�(du��)���������f��һ��(g��)����(sh��)�������ҵ�ע�⣬�@����
byte osal_start_timerEx( byte taskID, UINT16 event_id, UINT16 timeout_value )
{
halIntState_t intState;
osalTimerRec_t *newTimer;
HAL_ENTER_CRITICAL_SECTION( intState ); // Hold off interrupts. // Add timer
newTimer = osalAddTimer( taskID, event_id, timeout_value );
����һ��(g��)�µ��΄�(w��)�����r(sh��)��朱��С� if ( newTimer )
{
#ifdef POWER_SAVING
// Update timer registers
osal_retune_timers();
(void)timerActive;
#endif
// Does the timer need to be started? //�F(xi��n)��������r(sh��)���]�І���(d��ng)����ô����(d��ng)���r(sh��)��
if ( timerActive == FALSE )
{
osal_timer_activate( TRUE );//���ģ�ԭ�������@���(d��ng)�ģ��y����osal��ʼ���п����_ʼ������(d��ng)������������㷲�����߀�Ԟ��Լ����e(cu��)�ˣ�
}
} HAL_EXIT_CRITICAL_SECTION( intState ); // Re-enable interrupts. return ( (newTimer != NULL) ? ZSUCCESS : NO_TIMER_AVAIL );
} ��������@��(g��)����(sh��)�������@��(g��)����(sh��)��Ҫ���΄�(w��)�nj��΄�(w��)��һ��(g��)��(du��)��(y��ng)�¼��͵������Ķ��r(sh��)��朱��У��������ǂ�(g��)����(sh��)��ô��(zh��)���أ����}�ց��ˣ�ʲô�ӵ���r�²�ȥ�\(y��n)��osalTimerUpdate�����@��(g��)����(sh��)�أ��ڳ�ʼ�����^�����\(y��n)����һ�Σ����ǣ����������ô�\(y��n)�е��أ�����ǿ����r(sh��)��������\(y��n)�еģ���ô�@��(g��)�C(j��)���������ӵ��أ� �^�m(x��)�������^�m(x��)˼�����e������������ �������P(gu��n)�Y�ϣ�������r(sh��)�������(hu��)�{(di��o)���@��(g��)����(sh��)halTimerSendCallBack��������һ���@��(g��)����(sh��)��ԭ�ͣ� void halTimerSendCallBack (uint8 timerId, uint8 channel, uint8 channelMode)
{
uint8 hwtimerid; hwtimerid = halTimerRemap (timerId); if (halTimerRecord[hwtimerid].callBackFunc)
(halTimerRecord[hwtimerid].callBackFunc) (timerId, channel, channelMode);
}
�����ϵ�y(t��ng)���r(sh��)��������{(di��o)���@��(g��)����(sh��)���{(di��o)�ÙC(j��)�Ƶ����ف��������ҳ���(du��)��(y��ng)�Ķ��r(sh��)�����{(di��o)����(sh��)��ϵ�y(t��ng)���r(sh��)���Ļ��{(di��o)����(sh��)���@��(g��)void Onboard_TimerCallBack ( uint8 timerId, uint8 channel, uint8 channelMode)
{ if ((timerId == OSAL_TIMER) && (channelMode == HAL_TIMER_CH_MODE_OUTPUT_COMPARE))
{
osal_update_timers();
}
} �@�Ӿ�֪����������r(sh��)��ÿ���һ�Ό���(hu��)�{(di��o)���@��(g��)osal_update_timers();����(sh��)һ�Σ��F(xi��n)���҂�?c��)ٻ����������������@��(g��)����(sh��)�Ǹ����õģ����������������� osalTimerUpdate( tmr_decr_time )ԭ�ͣ�
*********************************************************************
* @fn osalTimerUpdate
*
* @brief Update the timer structures for a timer tick.
*���¶��r(sh��)���Ĕ�(sh��)��(j��)�Y(ji��)��(g��u) * @param none
*
* @return none
*********************************************************************/
static void osalTimerUpdate( uint16 updateTime ) {
halIntState_t intState;
osalTimerRec_t *srchTimer;
osalTimerRec_t *prevTimer;
osalTimerRec_t *saveTimer;//�@Щ��朱�������(y��ng)ָᘣ���Ҫ�£�֪���ᣬ���W(xu��)�^�ˣ��Ǻ� HAL_ENTER_CRITICAL_SECTION( intState ); // Hold off interrupts. // Update the system time
osal_systemClock += updateTime;//����ϵ�y(t��ng)�r(sh��)�g���@��(g��)osal_systemClock ��һ��(g��)�dz���Ĕ�(sh��)��static uint32 osal_systemClock; // Look for open timer slot
if ( timerHead != NULL )
{
// Add it to the end of the timer list
srchTimer = timerHead;
prevTimer = (void *)NULL; // Look for open timer slot
while ( srchTimer )
{
// Decrease the correct amount of time
if (srchTimer->timeout <= updateTime)
srchTimer->timeout = 0;
else
srchTimer->timeout = srchTimer->timeout - updateTime; // When timeout, execute the task
if ( srchTimer->timeout == 0 )
{
osal_set_event( srchTimer->task_id, srchTimer->event_flag );//�@��(g��)����(sh��)�����P(gu��n)�I�� // Take out of list
if ( prevTimer == NULL )
timerHead = srchTimer->next;
else
prevTimer->next = srchTimer->next; // Next
saveTimer = srchTimer->next; // Free memory
osal_mem_free( srchTimer ); srchTimer = saveTimer;
}
else
{
// Get next
prevTimer = srchTimer;
srchTimer = srchTimer->next;
}
} #ifdef POWER_SAVING
osal_retune_timers();�@��(g��)����(sh��)�Ժ����f��
#endif
} HAL_EXIT_CRITICAL_SECTION( intState ); // Re-enable interrupts.
} �@��(y��ng)ԓ�����˰ɣ���Ҫ����timeout�ĕr(sh��)�g���(zh��)�� osal_set_event( srchTimer->task_id, srchTimer->event_flag )���õ��ȣ��Ѵ��w���̿��Y(ji��)һ���ځ�����������O(sh��)����osal_start_timerEx��������(sh��)�O(sh��)����һ��(g��)�¼�����������뵽���r(sh��)��朱��У��@�r(sh��)�r(sh��)������(d��ng)�������������ĕr(sh��)��͕�(hu��)�{(di��o)��osalTimerUpdate��������(sh��)����ÿ�Έ�(zh��)�к�(hu��)�z��r(sh��)�g��(du��)��(y��ng)timeout�Ƿ����0�����������ĕr(sh��)��͕�(hu��)�{(di��o)���@��(g��)����(sh��)osal_set_event( srchTimer->task_id, srchTimer->event_flag�����F(xi��n)���҂����м�(x��)��һ���@��(g��)����(sh��)��
byte osal_set_event( byte task_id, UINT16 event_flag )
{
osalTaskRec_t *srchTask;
halIntState_t intState;
srchTask = osalFindTask( task_id );//�ҵ��@��(g��)�΄�(w��)
if ( srchTask ) {
// Hold off interrupts
HAL_ENTER_CRITICAL_SECTION(intState);
// Stuff the event bit(s)
srchTask->events |= event_flag;//�O(sh��)������(y��ng)�¼��Ę�(bi��o)־�� ************************************** ע���@���events��(bi��o)־�����O(sh��)����һ��(g��)����ֵ�����@��(g��)����ֵ���nj�(du��)��(y��ng)���¼����ڈ�(zh��)�еĕr(sh��)����Ǹ���(j��)����(y��ng)��ֵ���(zh��)������(y��ng)���¼��� **************************************
// Release interrupts
HAL_EXIT_CRITICAL_SECTION(intState);
}
else
return ( INVALID_TASK ); return ( ZSUCCESS );
} �@��֪�����@��(g��)����(sh��)��Ҫ����λ����(y��ng)���¼���Ȼ����oϵ�y(t��ng)��̎����ϵ�y(t��ng)̎���@��(g��)��Ҫ�ǽ�(j��ng)�^݆ԃ ��Ҫ���@��(g��)����(sh��)��(sh��)�F(xi��n)�� osalTaskRec_t *osalNextActiveTask( void )
{
osalTaskRec_t *srchTask; // Start at the beginning
srchTask = tasksHead; // When found or not
while ( srchTask ) {
if (srchTask->events) {
// task is highest priority that is ready
return srchTask;
}
srchTask = srchTask->next;
}
return NULL;
} ������һ��(g��)ָ��typedef struct osalTaskRec
{
struct osalTaskRec *next;
pTaskInitFn pfnInit;
pTaskEventHandlerFn pfnEventProcessor;
byte taskID;
byte taskPriority;
uint16 events; } osalTaskRec_t; ��ָᘡ�
Ȼ���΄�(w��)���oretEvents = (activeTask->pfnEventProcessor)( activeTask->taskID, events );�@��(g��)̎���� �@߀�]�нY(ji��)�����҂�?c��)��_�^�ᵽ���@��(g��)߀�]�н�Q�� MSGpkt = (afIncomingMSGPacket_t *)osal_msg_receive( SampleApp_TaskID );���K�ڻ��ˣ��۰��� �@���漰���ɂ�(g��)��(sh��)��(j��)�Y(ji��)��(g��u)�� typedef struct
{
void *next;
uint16 len;
byte dest_id;
} osal_msg_hdr_t; typedef struct
{
uint8 event;
uint8 status;
} osal_event_hdr_t; �Ҳ���һ�����@ôһ��(g��)����(sh��)����Ϣ���P(gu��n)�ģ������� *********************************************************************
* @fn osal_msg_send
*
* @brief
*
* This function is called by a task to send a command message to
* another task or processing element. The sending_task field must
* refer to a valid task, since the task ID will be used
* for the response message. This function will also set a message
* ready event in the destination tasks event list.
*�@��(g��)����(sh��)��Ҫ���΄�(w��)�{(di��o)�ðl(f��)��һ��(g��)������Ϣ����һ��(g��)�΄�(w��)����̎��Ԫ�أ�ͬ�r(sh��)�@��(g��)����(sh��)����(hu��)�O(sh��)��һ��(g��)��Ϣ�¼���Ŀ���΄�(w��)���¼��б���
*
* @param byte destination task - Send msg to? Task ID
* @param byte *msg_ptr - pointer to new message buffer
* @param byte len - length of data in message
*
* @return ZSUCCESS, INVALID_SENDING_TASK, INVALID_DESTINATION_TASK,
* INVALID_MSG_POINTER, INVALID_LEN
*/
byte osal_msg_send( byte destination_task, byte *msg_ptr )
{
if ( msg_ptr == NULL )
return ( INVALID_MSG_POINTER ); if ( osalFindTask( destination_task ) == NULL )
{
osal_msg_deallocate( msg_ptr );
return ( INVALID_TASK );
} // Check the message header
if ( OSAL_MSG_NEXT( msg_ptr ) != NULL ||
OSAL_MSG_ID( msg_ptr ) != TASK_NO_TASK )
{
osal_msg_deallocate( msg_ptr );
return ( INVALID_MSG_POINTER );
} OSAL_MSG_ID( msg_ptr ) = destination_task; // queue message
osal_msg_enqueue( &osal_qHead, msg_ptr );//����Ϣ�(du��)�У� // Signal the task that a message is waiting
osal_set_event( destination_task, SYS_EVENT_MSG );//�O(sh��)��һ��(g��)ϵ�y(t��ng)�¼��� return ( ZSUCCESS );
} �������@��(g��)osal_msg_send��������(sh��)ֻ�ǰl(f��)��һ��(g��)ϵ�y(t��ng)�¼��������Ñ��Զ��x���¼��o(w��)�P(gu��n)���Լ�����ģ��Ժ��(y��n)�C������ �F(xi��n)�ڴ�ґ�(y��ng)ԓ��Ȼ�_���˰ɣ��҂��K���ߵ����µ�һ���ˡ�
| 


 ����TQQ:125739409;���g(sh��)����QQȺ281945664


 QQ���Ѻ�Ⱥ
 QQ���g
 �vӍ��
�vӍ�� �vӍ����
 �ղ�
�ղ� ����
���� �
� ��
��