����LCD1602�@ʾ�����ڰl(f��)�ͽ��գ�������(sh��)�F(xi��n)��
�ęn��(n��i)���Rȫ������ʹ���f(shu��)�������P(gu��n)�(q��)��(d��ng)�ȡ�
��Q��STM32��Proteus�����հl(f��)��(w��n)�}�� ע�⣺ÿݔ��һ��(g��)�ַ���Ҫ��һ�Ρ��ք�(d��ng)�l(f��)�͡����o�������յ����_�ַ���
����ԭ��D���£�proteus���湤���ļ��ɵ��������������d��
�����հl(f��)
")
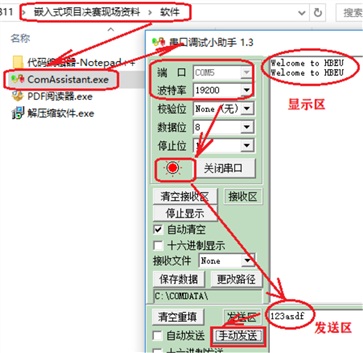
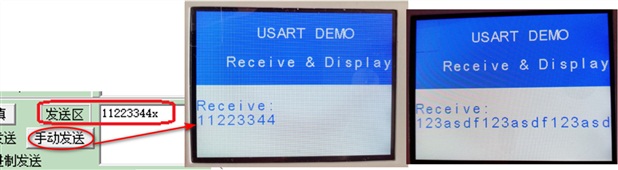
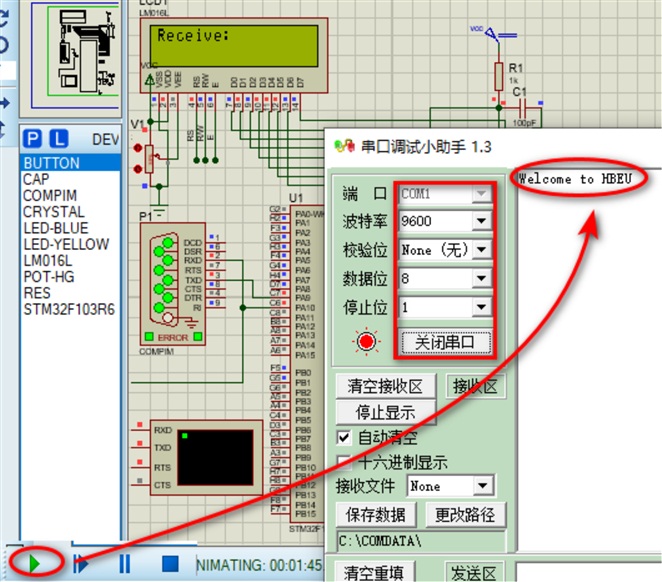
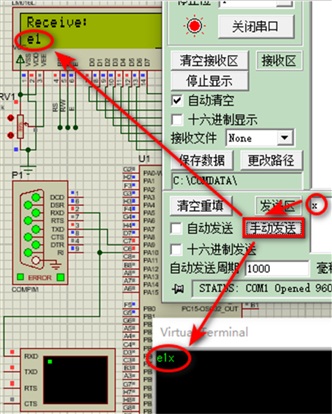
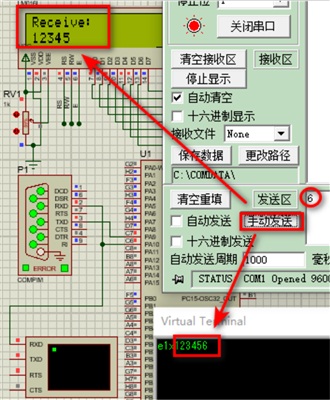
Proteus�Ĵ��ڷ������_(k��i)�����{(di��o)ԇ���֣���D11-30��ʾ���M(j��n)�봮���{(di��o)ԇ���ֺ���Ҫ�O(sh��)�����P(gu��n)����(sh��)������̖(h��o)��D11-29���鵽�Ķ˿�̖(h��o)����������(sh��)����(j��)��(sh��)�H�����(l��i)�_�������_(k��i)���ں��_(k��i)�l(f��)���ϵ�reset���I���@ʾ�^(q��)���ܽ��յ����_(k��i)�l(f��)��l(f��)���^(gu��)��(l��i)�ġ�Welcome to HBEU����ÿ����(f��)λ�Iһ�Σ��͕�(hu��)����һ�Σ���D11-31��ʾ���ڰl(f��)�ͅ^(q��)ݔ���ַ�����D11-32��ʾ���c(di��n)�����ք�(d��ng)�l(f��)�͡����_(k��i)�l(f��)���Ͼ����յ���(du��)��(y��ng)���ַ�������(j��)Ҫ�����ԡ�x���Y(ji��)�����ַ�������(d��ng)���^(gu��)20��(g��)�ַ���Ҳ���յ��ַ����� �D11-29 �鿴����̖(h��o) ��Proteus�з��洮�ڕr(sh��)���Ȱ��b��̓�M���ڡ��(q��)��(d��ng)����D11-33��ʾ�����b��֮��Ҳ���Բ鿴̓�M���ڵĶ˿�̖(h��o)���鿴�����c�D11-29һ�¡��ڴ����������O(sh��)�úô��څ���(sh��)��Proteus���\(y��n)�а��o��Ҳ�����ڴ��������յ���Ϣ����D11-34��ʾ��ע��ڲ����ʡ� �D11-30 �������� �D11-31 STM32�l(f��)�͔�(sh��)��(j��) �D11-32 STM32���ڽ��Ք�(sh��)��(j��) �D11-33 ̓�M�����(q��)��(d��ng)�ļ� �D11-34 Proteus���洮�ڽ��Ք�(sh��)��(j��) ����Proteus�](m��i)�Ќ�(du��)stm32�ĕr(sh��)犘�(sh��)������ģ�ͣ�ֻ�̶���һ�וr(sh��)�ֵ��������GETSYS/HCLK/PCLK����(sh��)����Proteus���nj�(sh��)�r(sh��)���棬���Դ������ʲ���Ӳ�����ʌ�(du��)��(y��ng)��ֵ�����ܸ��ߣ����ܸ��ͣ�����Proteus��̓�M�K���ǿ���ݔ��ǘ�(bi��o)��(zh��n)�����ʵģ����]�������O(sh��)��9600bit/s�����⣬��Proteus����ij����м���һ�l�Z(y��)��: RCC_SYSCLKConfig(RCC_SYSCLKSource_HSI); ���](m��i)��ԓϵ�y(t��ng)�����Z(y��)�䣬�t����������Ч��������r(sh��)犸���(sh��)�H�r(sh��)犴���һ�����ӕr(sh��)�`�����λ�C(j��)�l(f��)�͔�(sh��)��(j��)�r(sh��)��һ�ΰl(f��)��һ��(g��)�ַ����r(sh��)�����Օ�(hu��)���F(xi��n)�y�a�������Ҫһ��(g��)һ��(g��)�ַ��l(f��)�ͣ���D11-35��ʾ���ڰl(f��)�ͅ^(q��)����ݔ�롰e1x��֮��ע�⣺ÿݔ��һ��(g��)�ַ���Ҫ��һ�Ρ��ք�(d��ng)�l(f��)�͡����o����̓�M�K�ˣ�Virtual Terminal����(hu��)�@ʾ���l(f��)�͵������ַ�����(d��ng)STM32�Ĵ��ڽ��յ��ַ���x����ʾ�Y(ji��)������LCD�����@ʾ��e1���� ���˽��շ��㣬�����l(f��)��20��(g��)�ַ��Ğ����l(f��)��5��(g��)�ַ�����(d��ng)�҂�����ݔ�롰123456����ע�⣺ÿݔ��һ��(g��)�ַ���Ҫ��һ�Ρ��ք�(d��ng)�l(f��)�͡����o����LCD�@ʾ�յ����ַ�����12345������D11-36��ʾ�� �D11-35 STM32����������x���Y(ji��)������ �D11-36 STM32�����յ�6��(g��)�ַ��Ԅ�(d��ng)�Y(ji��)��
��Ƭ�C(j��)main�ļ�Դ���a��
- #include "stm32f10x.h"
- #include "stdio.h"
- //#include "led.h"
- #include "delay.h"
- #include "lcd1602.h"
- uint8_t USART_RXBUF[5];
- extern uint8_t RXOVER;
- /* Private function prototypes -----------------------------------------------*/
- void NVIC_Configuration(void);
- //void Delay_Ms(uint32_t nTime);
- void USART_Config(void);
- //void USART_SendString(int8_t *str);
- void USART_SendString(unsigned char *buf);
- int main(void)
- {
- uint8_t i;
- RCC_SYSCLKConfig(RCC_SYSCLKSource_HSI);
- //SysTick_Init();
- SysTick_Config(SystemCoreClock/100000);
- GPIO_Configuration();
- LCD1602_Init();
-
- LCD1602_Show_Str(0,0,"Receive:");
- USART_Config();
- //USART_SendString(Tx_Buf);//�l(f��)���ַ���
- USART_SendString("Welcome to HBEU\r\n");//�l(f��)���ַ���
- while(1)
- {
- if(RXOVER == 1){
- LCD1602_Show_Str(0,2,USART_RXBUF);
-
- for(i=0;i<5;i++){
- USART_RXBUF[i] =' '; //��ս��Յ^(q��)
- }
- RXOVER = 0;
- USART_ITConfig(USART1,USART_IT_RXNE,ENABLE);/////////////////////////////////////////////////////////////
- }
-
- /*if(USART_GetFlagStatus(USART1,USART_IT_RXNE)==SET)
- {
- USART_SendData(USART1,USART_ReceiveData(USART1));
- delay_ms(1000);
- }*/
-
- }
- }
- /*void USART_Config(void)
- {
- GPIO_InitTypeDef GPIO_InitStructure;
- USART_InitTypeDef USART_InitStructure;
- RCC_APB2PeriphClockCmd(RCC_APB2Periph_USART1|RCC_APB2Periph_GPIOA,ENABLE);
- //RCC_APB1PeriphClockCmd(RCC_APB2Periph_USART1, ENABLE);
-
- //NVIC_Configuration();
- //����USART2 TX���_����ģʽ
- GPIO_InitStructure.GPIO_Pin = GPIO_Pin_9;
- GPIO_InitStructure.GPIO_Mode = GPIO_Mode_AF_PP;
- GPIO_InitStructure.GPIO_Speed = GPIO_Speed_50MHz;
- GPIO_Init(GPIOA, &GPIO_InitStructure);
- //����USART2 RX���_����ģʽ
- GPIO_InitStructure.GPIO_Pin = GPIO_Pin_10;
- GPIO_InitStructure.GPIO_Mode = GPIO_Mode_IN_FLOATING;
- GPIO_Init(GPIOA, &GPIO_InitStructure);
- //����2����ģʽ����
- USART_InitStructure.USART_BaudRate = 9600;
- USART_InitStructure.USART_WordLength = USART_WordLength_8b;
- USART_InitStructure.USART_StopBits = USART_StopBits_1;
- USART_InitStructure.USART_Parity = USART_Parity_No ;
- USART_InitStructure.USART_HardwareFlowControl = USART_HardwareFlowControl_None;
- USART_InitStructure.USART_Mode = USART_Mode_Rx | USART_Mode_Tx;
- USART_Init(USART1, &USART_InitStructure);
-
- //USART_ITConfig(USART2,USART_IT_RXNE,ENABLE);
- USART_Cmd(USART1, ENABLE);
- }*/
- void USART_Config(void)
- {
- GPIO_InitTypeDef GPIO_InitStructure;
- USART_InitTypeDef USART_InitStructure;
- // ���_(k��i)����GPIO�ĕr(sh��)�
- //DEBUG_USART_GPIO_APBxClkCmd(DEBUG_USART_GPIO_CLK, ENABLE);
-
- // ���_(k��i)�������O(sh��)�ĕr(sh��)�
- //DEBUG_USART_APBxClkCmd(DEBUG_USART_CLK, ENABLE);
- RCC_APB2PeriphClockCmd(RCC_APB2Periph_GPIOA,ENABLE);
- RCC_APB2PeriphClockCmd(RCC_APB2Periph_USART1,ENABLE);
- NVIC_Configuration();
- // ��USART Tx��GPIO���Þ������(f��)��ģʽ
- GPIO_InitStructure.GPIO_Pin = GPIO_Pin_9;
- GPIO_InitStructure.GPIO_Mode = GPIO_Mode_AF_PP;
- GPIO_InitStructure.GPIO_Speed = GPIO_Speed_50MHz;
- GPIO_Init(GPIOA, &GPIO_InitStructure);
- // ��USART Rx��GPIO���Þ鸡��ݔ��ģʽ
- GPIO_InitStructure.GPIO_Pin = GPIO_Pin_10;
- GPIO_InitStructure.GPIO_Mode = GPIO_Mode_IN_FLOATING;
- GPIO_Init(GPIOA, &GPIO_InitStructure);
-
- // ���ô��ڵĹ�������(sh��)
- // ������
- USART_InitStructure.USART_BaudRate = 9600;
- // ���� ᘔ�(sh��)��(j��)���L(zh��ng)
- USART_InitStructure.USART_WordLength = USART_WordLength_8b;
- // ����ֹͣλ
- USART_InitStructure.USART_StopBits = USART_StopBits_1;
- // ����У�(y��n)λ
- USART_InitStructure.USART_Parity = USART_Parity_No ;
- // ����Ӳ��������
- USART_InitStructure.USART_HardwareFlowControl = USART_HardwareFlowControl_None;
- // ���ù���ģʽ���հl(f��)һ��
- USART_InitStructure.USART_Mode = USART_Mode_Rx | USART_Mode_Tx;
- // ��ɴ��ڵij�ʼ������
- USART_Init(USART1, &USART_InitStructure);
- // ʹ�ܴ���
- USART_ITConfig(USART1,USART_IT_RXNE,ENABLE);
- USART_Cmd(USART1, ENABLE);
- }
- /**
- * @�f(shu��)�� USART2�ַ����l(f��)�ͺ���(sh��)
- * @����(sh��) str: ָ���ַ�����ָ�
- * @����ֵ None
- */
- /*void USART_SendString(int8_t *str)
- {
- uint8_t index = 0;
- do
- {
- USART_SendData(USART1,str[index]);
- while(USART_GetFlagStatus(USART1,USART_FLAG_TXE) == RESET);
- index++;
- }
- while(str[index] != 0); //�z���ַ����Y(ji��)����(bi��o)־
- }*/
- void USART_SendString(unsigned char *buf)
- {
- while (*buf != '\0')
- {
- while (USART_GetFlagStatus(USART1, USART_FLAG_TXE) == RESET);
- USART_SendData(USART1, *buf++);
- }
- }
- /**
- * @�f(shu��)�� ����������������
- * @����(sh��) None
- * @����ֵ None
- */
- void NVIC_Configuration(void)
- {
- NVIC_InitTypeDef NVIC_InitStructure;
- NVIC_PriorityGroupConfig(NVIC_PriorityGroup_1);
- /* Enable the RTC Interrupt */
- NVIC_InitStructure.NVIC_IRQChannel = USART1_IRQn;
- NVIC_InitStructure.NVIC_IRQChannelPreemptionPriority = 1;
- NVIC_InitStructure.NVIC_IRQChannelSubPriority = 0;
- NVIC_InitStructure.NVIC_IRQChannelCmd = ENABLE;
- NVIC_Init(&NVIC_InitStructure);
- }
 �Y��.7z
(7.93 MB, ���d��(sh��): 476)
�Y��.7z
(7.93 MB, ���d��(sh��): 476)
2021-2-10 16:54 �ς�
�c(di��n)���ļ������d����
STM32����
| 
 [��(f��)��朽�]

 ����TQQ:125739409;���g(sh��)����QQȺ281945664