|
最近經(jīng)理通知要做項目了,讓我選型一個LCD開始試著做下。這是我用仿真實現(xiàn)的一個smt32的硬件SPI1來驅(qū)動的ST7735R,難度挺小的,因為大部分的代碼LCD的廠商已經(jīng)給我們提供了,我們主要修改成硬件SPI來驅(qū)動就好了。 此次仿真上面有2個問題,不知道是代碼的問題還是仿真圖上的問題。第一個問題是仿真運行時有時會出通信數(shù)據(jù)傳輸問題,導致指令越界報警,這個可能是SPI不穩(wěn)定導致的;第二個問題是在改用SPI2或者SPI3來驅(qū)動沒有任何反應,猜測是代碼時鐘沒開對或者仿真圖上面還要加上具體晶振。 代碼工程和仿真工程都已壓縮打包,可放心下載。。。
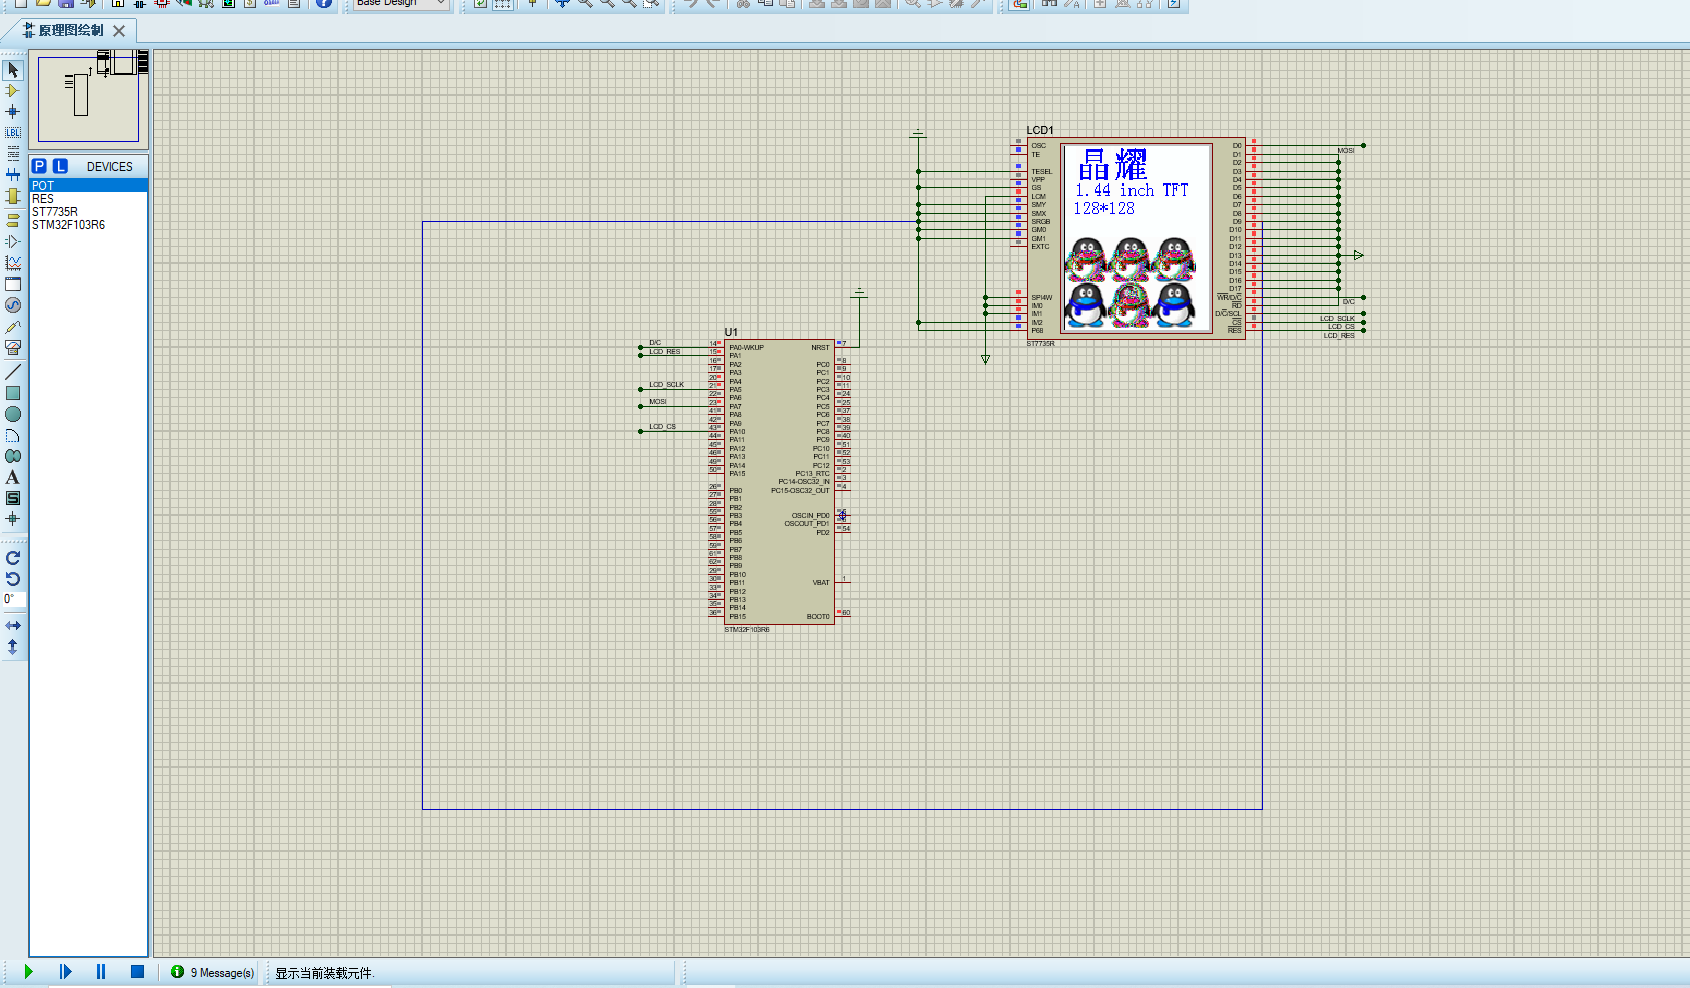
先貼上仿真實現(xiàn)圖:
再貼上部分代碼:
/**ST7735驅(qū)動**/ #include "ST7735.h" #include "usart.h" u16 BACK_COLOR, POINT_COLOR; //背景色,畫筆色
void WriteCommand_7735(u8 CmdData) //寫指令 { SPI_LCD_CS_LOW; //片選 SPI_LCD_COMMAND_W;//寫指令 SPI_I2S_SendData(LCD_SPIx,CmdData); while (SPI_I2S_GetFlagStatus(LCD_SPIx, SPI_I2S_FLAG_TXE) == RESET){} SPI_LCD_CS_HIGH; }
void WriteDate_7735(u8 Data) //寫8位數(shù)據(jù) { SPI_LCD_CS_LOW; //片選 SPI_LCD_DATA_W;//寫數(shù)據(jù) SPI_I2S_SendData(LCD_SPIx,Data); while(SPI_I2S_GetFlagStatus(LCD_SPIx, SPI_I2S_FLAG_TXE) == RESET){} SPI_LCD_CS_HIGH; }
void WriteDate16(int data) //寫16位數(shù)據(jù) { WriteDate_7735(data>>8); WriteDate_7735(data); }
void LCD_Init(void) { LCD_RES_HIGH; delay_ms(5); LCD_RES_LOW; delay_ms(5); LCD_RES_HIGH; SPI_LCD_CS_HIGH; delay_ms(5); SPI_LCD_CS_LOW; //打開片選使能
WriteCommand_7735(0x11); //Sleep out delay_ms(120); //Delay 120ms //------------------------------------ST7735S Frame Rate-----------------------------------------// WriteCommand_7735(0xB1); WriteDate_7735(0x05);
WriteCommand_7735(0x11);//Sleep exit delay_ms (120); //ST7735R Frame Rate WriteCommand_7735(0xB1); WriteDate_7735(0x01);
WriteDate_7735(0x2C); WriteDate_7735(0x2D); WriteCommand_7735(0xB2); WriteDate_7735(0x01); WriteDate_7735(0x2C); WriteDate_7735(0x2D); WriteCommand_7735(0xB3); WriteDate_7735(0x01); WriteDate_7735(0x2C); WriteDate_7735(0x2D); WriteDate_7735(0x01); WriteDate_7735(0x2C); WriteDate_7735(0x2D);
WriteCommand_7735(0xB4); //Column inversion WriteDate_7735(0x07); //ST7735R Power Sequence WriteCommand_7735(0xC0); WriteDate_7735(0xA2); WriteDate_7735(0x02); WriteDate_7735(0x84); WriteCommand_7735(0xC1); WriteDate_7735(0xC5); WriteCommand_7735(0xC2); WriteDate_7735(0x0A); WriteDate_7735(0x00); WriteCommand_7735(0xC3); WriteDate_7735(0x8A); WriteDate_7735(0x2A); WriteCommand_7735(0xC4); WriteDate_7735(0x8A); WriteDate_7735(0xEE); WriteCommand_7735(0xC5); //VCOM WriteDate_7735(0x0E); WriteCommand_7735(0x36); //MX, MY, RGB mode WriteDate_7735(0xC8);
//ST7735R Gamma Sequence WriteCommand_7735(0xe0); WriteDate_7735(0x0f); WriteDate_7735(0x1a); WriteDate_7735(0x0f); WriteDate_7735(0x18); WriteDate_7735(0x2f); WriteDate_7735(0x28); WriteDate_7735(0x20); WriteDate_7735(0x22); WriteDate_7735(0x1f); WriteDate_7735(0x1b); WriteDate_7735(0x23); WriteDate_7735(0x37); WriteDate_7735(0x00);
WriteDate_7735(0x07); WriteDate_7735(0x02); WriteDate_7735(0x10); WriteCommand_7735(0xe1); WriteDate_7735(0x0f); WriteDate_7735(0x1b); WriteDate_7735(0x0f); WriteDate_7735(0x17); WriteDate_7735(0x33); WriteDate_7735(0x2c); WriteDate_7735(0x29); WriteDate_7735(0x2e); WriteDate_7735(0x30); WriteDate_7735(0x30); WriteDate_7735(0x39); WriteDate_7735(0x3f); WriteDate_7735(0x00); WriteDate_7735(0x07); WriteDate_7735(0x03); WriteDate_7735(0x10);
WriteCommand_7735(0x2a); WriteDate_7735(0x00);WriteDate_7735(0x00); WriteDate_7735(0x00);WriteDate_7735(0x7f); WriteCommand_7735(0x2b); WriteDate_7735(0x00);WriteDate_7735(0x00); WriteDate_7735(0x00);WriteDate_7735(0x7f);
/*下面這2個指令對ST7735R好像不起作用,仿真會報警告,應該是沒有這2條指令*/ //WriteCommand_7735(0xF0); //Enable test command //WriteDate_7735(0x01); //WriteCommand_7735(0xF6); //Disable ram power save mode //WriteDate_7735(0x00); WriteCommand_7735(0x3A); //65k mode WriteDate_7735(0x05); WriteCommand_7735(0x29); //Display on WriteCommand_7735(0x2C); }
代碼就貼這么多吧,具體的下載來看吧,網(wǎng)上基于這款LCD的項目挺少的。特別注意點是設(shè)置SPI的CS腳,費了我一天時間在那測試,一直沒找到錯誤點,當時都快哭了,終于還是做出來了,希望以后的同學仿真少走彎路吧。CS腳(片選)一定要設(shè)定成復用推挽輸出,并且不要設(shè)置到SPI的NSS腳上,即PA4,接上反正是運行不起來。。。
| 
 [復制鏈接]